Welcome back for the resiliency series, KNEE EDITION!
Over the last year, we have been covering the most common areas of the body where people have their aches and pains. Each week will cover a specific area that we suggest people work on in order to resist injury.
This will NOT serve as a way to treat an injury or direct medical advice, but it will be a resource that will house the most up-to-date information on how to make yourself stronger and and more… RESILIENT! We ALWAYS suggest you seek medical attention if you feel you need more help.
Let’s talk about our knees. Chances are, most of you reading this post have had some type of knee pain at some point if you are active. We use our knees all of the time, including walking, climbing stairs, running, squatting, lunging, etc. Knee pain can have multiple causes, but I’m here to talk about nontraumatic knee pain. It’s often referred to under one umbrella as “patellofemoral pain.” This can refer to a few different things, but all of them refer to a sensitivity of the structure surrounding your knee cap. In my experience, these types of overuse injuries are 100% treatable.
I am going to take you through some of our favorite exercises and ways to prescribe exercises to help strengthen and protect against injuries in this area.
One thing to remember, and this is a common theme in these types of posts, injuries can NOT be 100% prevented by any program, we can only reduce our risk. The best way to reduce our risk is to get stronger!
The key to improving the durability of our tendons is to work on heavy, slow resistance training. This means exercise that uses weight, is performed slowly and is challenging enough to make changes in the actual structures within. What we know from research, which is consistently proven time and time again, that exercises have to be challenging enough to make changes within. We don’t have to pose a great challenge with every single exercise we do, but for the ones that we are hoping to make measurable gains with, we must challenge ourselves regularly.
Now, onto the good stuff. Here are a few of our fave exercises to perform to help improve knee durability. It is suggested that you begin at a level that you think will be challenging enough, but not so hard that you are sore for days, but sometimes it takes a few sessions to figure out the difficulty level.
We suggest that each of these exercises be performed 3-4 weekly to make measurable changes. We also suggest repetition ranges of 8-10 for 3, challenging sets.
Basic air squat
One medical myth is that you should not let your knees go past your toes when you squat. PLEASElet your knees go over your toes during a squat. You are missing out on the added benefits of performing a full depth squat- increased muscle tone in your quadriceps, in addition to your inner thigh and gluteal muscles! When you are injured, a squat can seem like an impossible task, so we may work with modifying this movement based on your sensitivity.
Step down
Seems easy, right? You likely do this every day if you have to walk up and down stairs to get where you are going. You can make this exercise harder by increasing the time over tension (think holding for 20 sec, or slowing down the movement to a snail’s pace) or adding weight!
Hamstring curls
I’ve mostly listed quad-dominant exercises here, as your quad is the muscle that directly passes through your knee cap. However, it is important to maintain balance with strength training, so I had to include a great posterior chain exercise as well. Maintaining strong hamstrings is also an important part of injury prevention to maintain a good quad:hamstring strength ratio.
Lunges
Lunges are more of a unilateral exercise, which is great for targeting differences in strength from you left to your right side. You can perform lunges in both the sagittal plane (front and back) and in the frontal plane (left and right) as pictured above.
Box Jump
Great for improving power and speed in your quadriceps! This explosive motion is great for improving performance.
This concludes our Knee edition of the Resiliency series. If you learned something, give us a shout! If you know someone who would learn something, pass it along with a share!
Thank you for reading and stay tuned for future posts…..
Here we go again with another rendition of our resiliency series! If you have been following along, thank you! We have been enjoying the feedback from our wonderful followers on our presented topics.
If this is your first time reading, thanks for joining!
This series is a set of topics that are supposed to help YOU build up resilience to the many aches, pains, and physical issues people face. I dove into things like shoulder pain, low back pain, foot pain but now we take a slightly different approach.
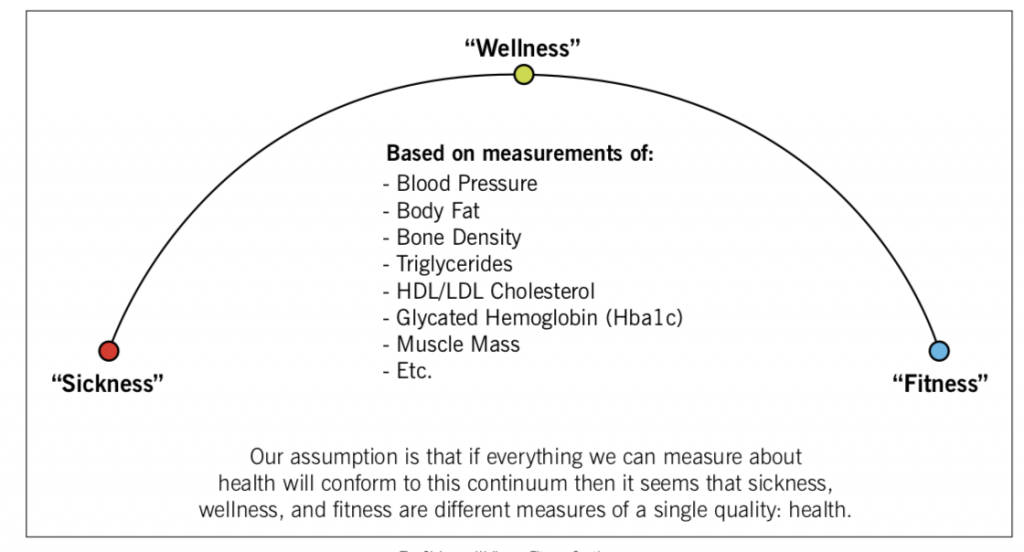
I want to introduce you to the SICKNESS, WELLNESS, FITNESS continuum.
I will reference CrossFit HQ (headquarters) for this concept. As many of you know, I hold Crossfit near and dear to my heart despite many accusations that it is a leading cause of injury and overtraining in the general population. That being said, they have done a great deal of work over the past few years to direct the goal of their brand to target the health of the general population. One concept that they are shining light on is this SICKNESS, WELLNESS, FITNESS continuum.
Photo Credit: Crossfit Journal, August 2016
In brief, they suggest to set a goal to strive for the “fitness” level of this continuum. At the fitness level we are much more resistant to things like injury and disease.
We can be categorized as sick for a variety of reasons such as physical injuries or health conditions. For the purposes of today, we are going to refer to being “sick” as suffering from a physical injury, “well” as being back to baseline, and “fit” as being more resistant to injury and disease.
Example 1
Two people get into a car accident and suffer the exact same injures. In this example, let’s say they are both of the same age, gender and do not possess any underlying health conditions.
Person one exercises at a high level and can squat and deadlift more than their bodyweight. They train 4-5 days per week.
Person two exercises at an average level of fitness and primarily exercises with light weights. They train 3-4 days per week.
Who do you think will have a shorter recovery?
BOTH of these people were likely on the “fitness” side of the continuum pre-accident, but the one with more strength is likely more fit thus more likely to have a shorter recovery time. They both slid onto the sickness side but the more fit person did not slide as far, as their baseline was higher. Hence they have less distance to travel to get back to where they were.
Example 2
Person comes to PT with shoulder pain. They have been suffering from it for a while and can be considered on the sickness side of the continuum.
They are rehabbed, their pain goes away and their PT got them to baseline. They can do everything they are doing before they got hurt.
Where do they stand? I would consider them being in the wellness category at this point. They could easily slip back down to sickness if they put their shoulder under the conditions it faced just before they got hurt before. Unless, they prepare it to handle more…
Why are we stopping at wellness or the low end of fitness?
These examples explain the idea that we MUST slowly and gradually put our bodies under exercise stress in order to see the changes we need. There is a TON of research out there that backs the idea that the more fit someone is, the less likely they are to get sick or injured. This “fit” idea is in both areas of cardio and weight lifting.
The better your cardiovascular fitness you have, the less likely you are to develop chronic disease.
The stronger your muscles, tendons, and ligaments are, the less likely you are to develop injuries to them.
They key is to train you body at a level that actually creates a change. Slowly push the boundaries of challenge with weight lifting and your cardio of choice and you WILL see the benefits long term.
If you have never lifted heavy weights, I HIGHLY suggest consulting a health and fitness pro to provide you with the proper programming to keep you safe.
Let’s strive for getting as fit as possible and your body will thank you.
Welcome back for the resiliency series, HEART RATE MONITOR EDITION! WTF?
Are you someone who is always sore? Maybe you have been told by trainers or coaches that it’s good to take rest days but like…
What is a rest day?
How should you go “light” during a workout? Keep reading.
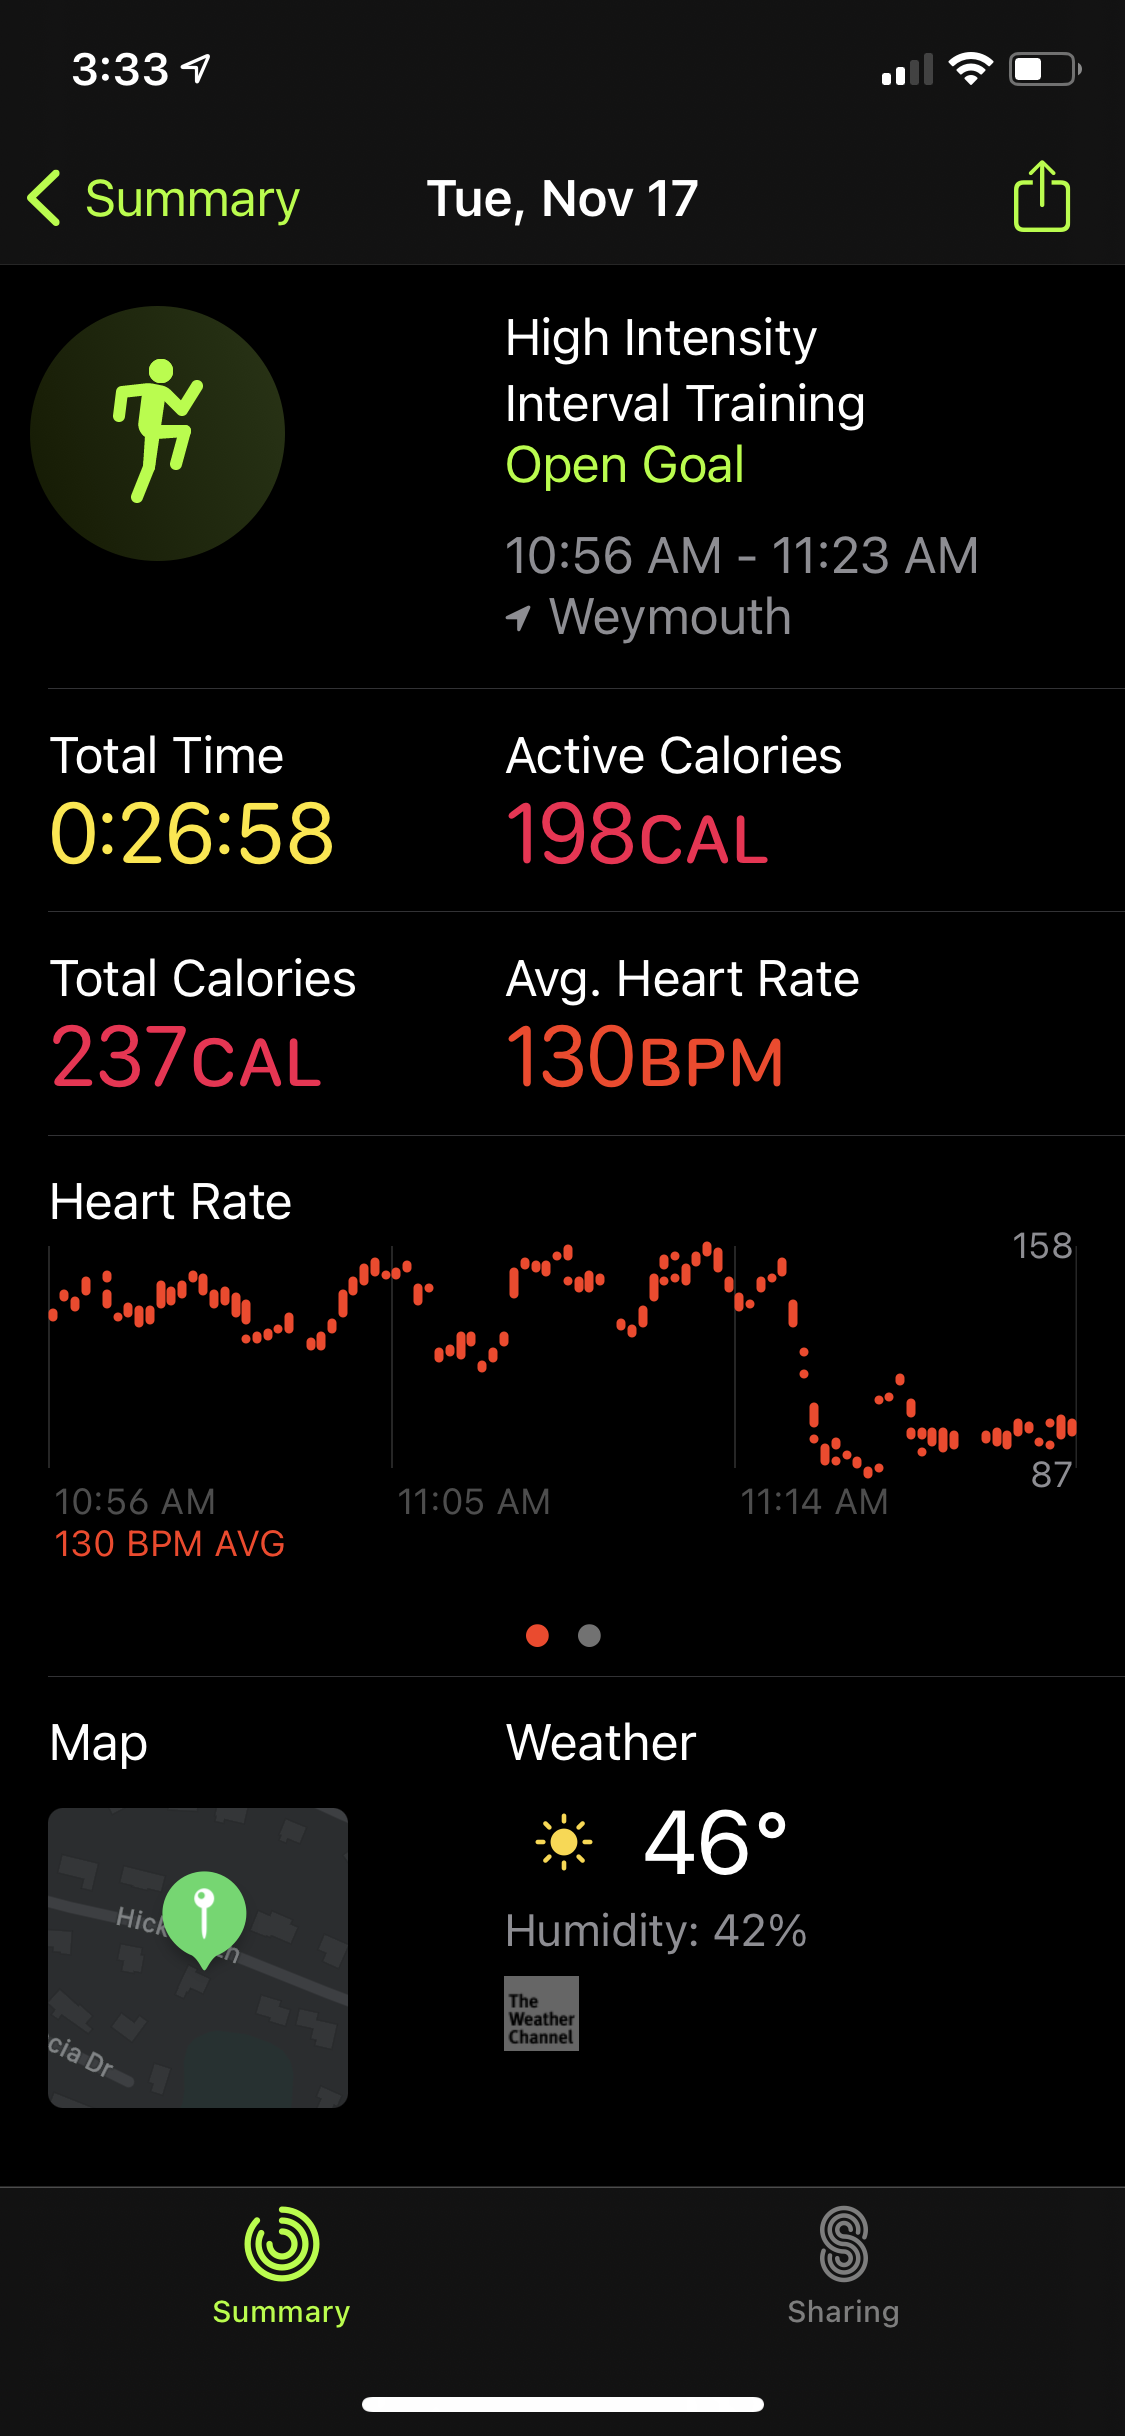
I began using an Apple Watch back in the summer. I was never someone who cared too much about my activity levels but I really needed to know what time it was and I love new gadgets, so why not…
This is not a blog to promote the Apple Watch at all BUT it is a post to talk about how you can use your heart rate monitor to gauge how hard you are working and why that’s important!
If you have read all the other resiliency series posts, you’ll be sick of hearing this but here’s goes…
Over the next few months (or however long it takes for me to run out of content), I will be covering the most common areas of the body where people have their aches and pains. Each week will cover a specific area that we suggest people work on in order to resist injury.
This will NOT serve as a way to treat an injury or direct medical advice, but it will be a resource that will house the most up-to-date information on how to make yourself stronger and and more… RESILIENT! We ALWAYS suggest you seek medical attention if you feel you need more help.
This time is a bit different! I am going to talk about exercise intensity, aka “how hard your body is working at a given time”.
Why do you care? ONE BIG REASON!
Most people who get hurt, get hurt because they put their body through more than it can handle, time after time, after time without enough lighter days…
Most gym goers aren’t in touch with being able to fine tune their exercise intensity – it’s either really hard or nothing.
I am going to explain how you can use your heart rate monitor (Apple Watch, Fitbit, OT beat, Garmin… the list goes on) to decrease your injury risk and use it as a tool to monitor your exercise intensity!
Here is what is recommended by the Academy of Sports Medicine:
“All healthy adults aged 18–65 yr should participate in moderate intensity aerobic physical activity for a minimum of 30 min on five days per week, or vigorous intensity aerobic activity for a minimum of 20 min on three days per week.”
– Directly from the ACSM website, “Physical Activity Guidelines 2020”
Note how it recommends some moderate intensity days and some vigorous intensity days? They say that for a reason! We aren’t supposed to push our bodies into a puddle of sweat every workout!
That being said, most people don’t know what moderate vs vigorous feels like. You can use your favorite heart rate gadget to help!
Start with calculating your max heart rate…
Do you know how to calculate it? You can quickly do some math,
220 – (your age) = Your maximum heart rate
We can gauge our exercise intensity by using a percentage of your maximum heart rate.
It is easy to break it up into zones
Very Easy = 50-60%
Light = 61-70%
Moderate = 71-85%
Vigorous (high intensity) = 85% +
So why does this matter?
If you are someone who goes hard every, single workout, it is eventually going to catch up to you. Maybe you haven’t gotten hurt, but maybe you are just sore all the time… should we just chalk it up to a good workout? That’s not how you should feel all the time! Soreness and stiffness CAN be a precursor to injury.
Key Points
It is recommended that you exercise twice per week at a high intensity (85% or more max HR), and at least three times per week at a moderate intensity (71-85% max HR).
Use your HR monitor DURING a workout to gauge how hard you are working! Do the math so you know what your moderate intensity and high intensity numbers are ahead of time!
If you “aren’t feeling it” on a given day or you know you should be going easy, use your HR monitor to tell you how hard you are working and stay in the easy to light zones!
You can decrease your risk of injury by varying your intensity levels throughout the week to prevent yourself from overdoing it!
I hope this brought some light to how valuable heart rate-based training and monitoring can be. Next time you are in a workout, try and guess what your HR is based on how hard you are working… Maybe you can get so in tune with your body that you can accurately guess the number!
Welcome back for the resiliency series, ACHILLES EDITION!
Over the next few months (or however long it takes for me to run out of content), I will be covering the most common areas of the body where people have their aches and pains. Each week will cover a specific area that we suggest people work on in order to resist injury.
This will NOT serve as a way to treat an injury or direct medical advice, but it will be a resource that will house the most up-to-date information on how to make yourself stronger and and more… RESILIENT! We ALWAYS suggest you seek medical attention if you feel you need more help.
If you don’t know what the Achilles tendon is then you probably won’t read much further. That is unless you really love to read what I write and want to gain some knowledge 👩🏻⚕️…
The Achilles tendon is a structure that connects your calf muscles to your heel! It serves as a very important structure that we use everyday when we walk, stand, run, climb stairs, etc. It is also a common structure to be torn and the most common population who tear are middle-aged, active men. Those who participate in recreational sports such as tennis, basketball, soccer or any quick start / stop play. I am not saying that it’s a common injury, I am saying that when it does happen, it’s the middle-aged population who suffer more from it. You do NOT want this injury because it can be a long, long road to recovery.
I am going to take you through some of our favorite exercises and ways to prescribe exercises to help strengthen and protect against injuries in this area.
One thing to remember, and this is a common theme in these types of posts, injuries can NOT be 100% prevented by any program, we can only reduce our risk. The best way to reduce our risk is to get stronger!
The key to improving the durability of our tendons is to work on heavy, slow resistance training. This means exercise that uses weight, is performed slowly and is challenging enough to make changes in the actual structures within. What we know from research, which is consistently proven time and time again, that exercises have to be challenging enough to make changes within. We don’t have to pose great challenge with every single exercise we do, but for the ones that we are hoping to make measurable gains with, we must challenge ourselves regularly.
Now, onto the good stuff. Here are a few of our fave exercises to perform to help improve Achilles durability. It is suggested that you begin at a level that you think will be challenging enough, but not so hard that you are sore for days, but sometimes it takes a few sessions to figure out the difficulty level.
We suggest that each of these exercises be performed twice weekly to make measurable changes. We also suggest repetition ranges of 8-10 for 3, challenging sets.
Double leg calf raises off a step
FYI… This exercise can be done with or without shoes. I was trying to be cool without shoes but as the weight goes up, the step will feel more and more sharp and shoes may allow you to go heavier 🙂
This is a great exercise to target the upper calf which has a direct correlation with the Achilles. This can be loaded with a dumbbell, kettlebell, barbell, weight vest…
Soleus heel raise
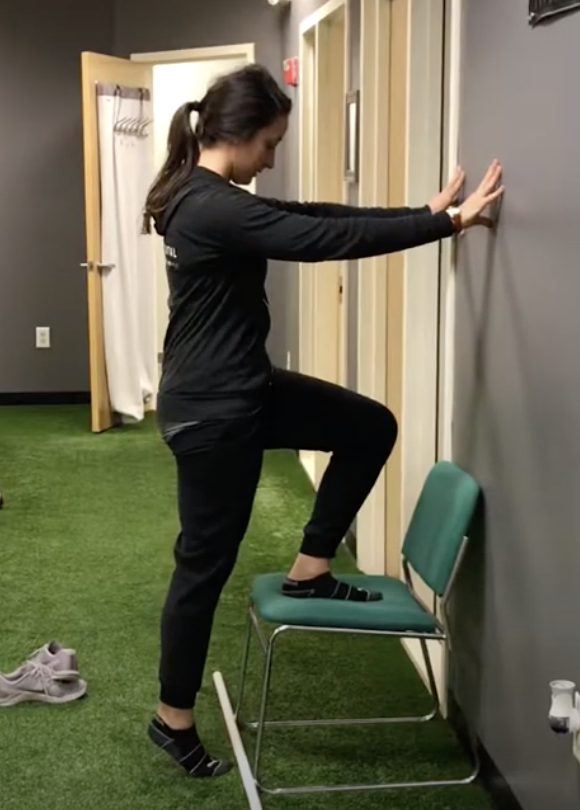
This is a new one for most (myself included), but a really important muscle in the Achilles connection is the Soleus or lower calf. This one is not the easiest one to set up but you have to find a way to weight your working leg with a bent knee. Some gyms have those seated, bent knee calf raise machines? You can use that!
Double leg Soleus raise off a step
Also can be done with shoes, LOL
This one targets the same muscle group as the previous, but is a little easier to set up. However, I do find that most people get a pretty good quad burn here taking away from the calf work that is intended. You have to keep your knees bent the whole time and then coordinate holding some weight once 8-10 of bodyweight exercise gets to be too easy.
Lastly… getting in some regular jumping is always a great way to train the Achilles to take on the activities that we want to perform in our regular, daily lives! I am referring to things like playing tennis, basketball, playing with kids and grandkids, etc.
Jumping rope
If you aren’t proficient at jumping rope, not to worry. Simply jumping up and down, in place for about 20 seconds for 4 rounds is a perfect place to start!
This concludes our Achilles edition of the Resiliency series. If you learned something, give us a shout! If you know someone who would learn something, pass it along with a share!
Thank you for reading and stay tuned for more next month… topic is TBD.
Welcome back for the resiliency series, SHOULDER EDITION!
Over the next few months (or however long it takes for me to run out of content), I will be covering the most common areas of the body where people have their aches and pains. Each week will cover a specific area that we suggest people work on in order to resist injury.
This will NOT serve as a way to treat an injury or direct medical advice, but it will be a resource that will house the most up-to-date information on how to make yourself stronger and and more… RESILIENT! We ALWAYS suggest you seek medical attention if you feel you need more help.
Most people want shoulder help when they are in pain.
Kicking it off with a disclaimer… Start off by understanding what kind of shoulder help you need. If you are dealing with some pain, it is best that you go easy with these recommendations because some moves aren’t for everyone! All the moves are worth a try, but go light and slow at first.
The exercises and advice I have provided in this post are the most common long-term exercises that I recommend folks be performing regularly to keep the shoulders happy for a lifetime.
First piece of advice… Some pain is okay! Unbearable pain is not! The shoulder has a ton of moving parts and many people avoid certain movements because of pain. Sometimes, what can happen is that movement lessens and pain increases over time… The cycle repeats and you lose range of motion. You should try and perform movements that make the pain happen a bit, but then back off. Don’t barge through unbearable pain, but when it’s manageable and doesn’t send you off into days of soreness, then it’s okay.
Second… You don’t just need rotator cuff-specific exercise! If you are reading that line and it seems foreign to you, then disregard and keep reading. The rotator cuff is a group of muscles in the shoulder can are common sources of pain and injury in many active people. Many people come to me wanting exercises specifically for their rotator cuff because they were told that is what needs to get stronger. Sure! It does need to get stronger, but there are many common exercises that attack the rotator cuff that we overlook (ie. bench press, overhead press, rows).
Third… Try out these movements and tell me what you think! I would suggest pick 2-3 of the following to test out. Sprinkle them in 2 days per week, you don’t need much!
Scaption! This one is great for the shoulders. It really builds strength well and it’s a common place of weakness for most people. Begin with 3 sets of 8-10, slow reps.
Lateral raises! Another one similar to scaption but it’s at a slightly different angle. The position of the hand does matter and in this video I am demonstrating palms down. Keep those elbows straight!
The Swimmer! 🌶 Spice-E. This one is no joke, don’t grab 5’s… Trust me. Shoot for 3 sets of 8.
Single arm row! This is a staple in any upper body program for longevity and shoulder strength. We forget that these big moves are super beneficial for any shoulder injury and really help with long-term health. As for reps and sets, this one can start with 3 sets of 10-12 but the rep schemes are really endless and all depend on your goals.
DB bench press! Very similar to the row, this one is an oldie but a goodie. It is a solid, big shoulder move that hits the major push direction that we need for lots of life things (lawn mowing, picking up heavy things, reaching overhead, etc). Reps and sets? same as above.
DB incline press! This one is like a cross between the flat bench press and the overhead press. It is more challenging than the flat bench, but not as hard as the overhead one. This is a great exercise if overhead pressing is a little uncomfortable. Ditto the above on the reps and sets! Side note… when you’re having pain, reps and sets really matter but if your goal is to just get stronger a 3 sets of 8-10 is a great place to begin.
Front rack carry Last but NOT least… this one is a challenge to the WHOLE shoulder and a great way to learn to carry more groceries into the house (LOL). It also gets the rotator cuff to work on all cylinders! Try it out for 30 seconds per side for 3 rounds.
Welcome to the first of many post in the Resiliency Series!
What is this series all about? Here’s a brief…
Over the next few months (or however long it takes for me to run out of content), I will be covering the most common areas of the body where people have their aches and pains. Each week will cover a specific area that we suggest people work on in order to resist injury.
This will NOT serve as a way to treat an injury or direct medical advice, but it will be a resource that will house the most up-to-date information on how to make yourself stronger and and more… RESILIENT! We ALWAYS suggest you seek medical attention if you feel you need more help.
So, you’re continuing to read because you think I am going to give some secrets about how to help the lower back… right?
Keep reading… Unless you have been helped by us for lower back pain in the past, this is going to be information that you have NEVER been told before.
All the information I am going to provide will be through answering the most common questions that we get when we help people (many people) with lower back pain.
First question…
“What exercises should I be doing? Probably more core and stretching?“
Exercises are great at helping take care of and prevent lower back pain! Before I show off some of our favorite exercises, I want to point out a VERY important point… It is NOT all about exercise. There are MANY, MANY factors that affect lower back pain. Just adding ‘more core and stretching’ will definitely not do the trick.
…But because you asked, here are some of our faves!
*DISCLAIMER* IF you are having pain, please don’t just go wild with these thinking they are right for you. Try these if you want to help BUILD your lower back but you aren’t currently in a flare-up.
Assisted sit ups!! What?! Sit-ups?! Yes! These are GREAT at not only building strength but also at building flexibility in the lower back and hamstrings. Try this with a thick band, dog leash, something attached to a firm pole and work your way up like the video! Start with 2 sets of 8, 3 days per week.
Back Extensions!! Yup! You need to go the other way, too… The lower back is meant to bend forward AND backwards. You can use a bench, ball (like the video), ottoman, bench… just anchor your feet and extend away! Start with 2 sets of 8, 3 days per week.
There are MANY more, but those are some gem’s… There is also A TON of research backing the importance of a FULL-BODY resistance training program for long-term low back pain management… JUSY FYI.
Next question…
“Will I have back pain forever?”
The greatest risk factor for injury… Is a previous injury! Once you have had it, the likelihood of it coming back is higher than before you had it. The good new is that if you know how to manage it, it can be, well… managed!
We discussed some exercises above that are great at keeping you limber and strong, but that just covers the physical. There are MANY other factors that can contribute to symptoms:
Stress
Being tired
Fear of the pain itself
… Just to name a few. It’s not all about the movements and activities, it is the inner environment that can contribute to a flare-up or a period when you “notice” your back pain coming on.
Find ways to manage your stress, get some sleep, and try to lower your fears of the pain. 80% of cases of low back pain get better! That’s a promising number…
You will not have to deal with this forever if you get some help… Be heard, get some explanations, set some goals, trust the process and stay as positive as hell.
Last question…
“What could have caused this pain? I don’t remember doing anything?“
Factors such as poor sleep and high stress can put you at risk for an injury or a flare-up. Outside factors CAN contribute to setting off a flare-up, they make you more susceptible!
It’s VERY similar to be common cold. When you are under more stress, you’re tired, your immune system is low, you are more likely to get sick.
Same thing goes for lower back pain!
On the other hand, sometimes we can’t find an exact cause… it’s usually a handful of things that bring it on so don’t rack your brain!
Many people want to know the cause so we can prevent it from coming back. Most times, we don’t nail it down, we figure out how to handle it in the future by a bit of trial and error and seeing how your body responds to what we do.
I really hope you got something out of this. I am super passionate about helping people with short and long-term lower back pain!
Stay tuned for more Resiliency Series monthly topics!