Have you ever twisted or sprained your ankle? Sometimes it
happens while you’re playing sports, working out, hiking, or even just walking around
the house. Either way, this can be quite painful, and I’ll get asked a lot of
times if it’s worth coming in for physical therapy.
The answer is yes!
When you sprain your ankle the ligaments that help support the ankle joint are
overstretched. It can take a while for these ligaments to heal and be back to
full strength, but we don’t always think about the other parts of our ankles
that are hurt. Our muscles have a harder time doing their job for walking and
turning because of the stiffness and pain. We also have receptors in our ankles
that help keep us balanced. Basically, the receptors tell our body when we are
off balance and how to correct it. When you sprain your ankle, these receptors
and your muscles are not able to do their job very well, which can lead to poor
balance and difficulty with normal activities like walking. Without some specific
exercises it can take a lot longer to get back to feeling your best. Especially
if you’re trying to get back to exercising it is really important to make sure
your body is prepared for the specific movements you want to do.
Right after spraining your ankle there are a few things you
should make sure to do and understand. This is the first step to helping your
ankle heal and get you back to 100%
1- Protect your ankle to prevent any further twisting or
injury to the area. This means restricting the activity on your ankle for about
1-3 days. Just enough to let the area start to heal, but not too long
either.
2- Elevate your ankle above your heart to help with the
swelling. Try about 20 minutes at a time.
3- Compression can also be helpful with swelling. Try this
with an ACE bandage or compression sleeve. It is important to know that this
isn’t the most important part of rehab for your ankle, but it definitely won’t
hurt either.
4- Active recovery is the most important part of
rehabbing your ankle. This means the bulk of getting your ankle better is going
to involve exercise and gradually challenging your ankle. This includes walking,
strengthening, balance, and plenty of other exercises.
In general, let pain be your guide with this process.
If something really hurts a lot, you’re probably not ready to do it. If
something hurts a little bit. It’s okay to keep doing.
After those first few days there are a few next steps in
this rehab to help you make a quick recovery.
1- The first thing you want to do is gradually load the ankle. This
means putting weight on it, walking, and performing light exercises. By gradually
challenging your ankle with weight bearing, and light exercises you will improve
your ankles ability to become strong, pain free, and balanced.
2- You also want to remain positive and optimistic throughout this process. Suffering
any kind of injury can be really difficult, especially when it keeps you from
doing the things you love. When you sprain your ankle, you might miss part of
your sports season or be unable to exercise with friends. This can be really
hard to deal with, especially if you’ve had other ankle sprains in the past. It
is important to remember to stay positive because it will get better, it just
takes time and hard work.
3- It is also really hard to keep doing cardio when you’ve sprained your ankle.
If you’re a runner or soccer player, it isn’t easy to do your normal workout. It’s
important to find a way to do some cardio. This could be riding a bike, using an
elliptical, or working out on a rower. Any of these will work great, just make
sure to keep some kind of aerobic exercise in your routine.
4- Finally, the most important part of rehabbing your ankle is to perform
specific exercises and gradually progress them. This means challenging your balance, range of motion, and strength. It will be important to work
within your limits, but also to push yourself so you can make steady progress. As
you get stronger the exercises should progress, so they are even more challenging
and specific to your goals. The specific exercises are going to be the most
important part of healing your ankle and will help you to have long term
success.
Remember, if you sprain your ankle PT can be really helpful!
It can help you recover faster and more fully so that the chances of having
another ankle sprain aren’t as high. Take time to recover fully so you can
get back to the things you love to do sooner and safer.
Plantar fasciitis (PF) is a term used to describe inflammation or pain on the bottom of the foot. The plantar fascia is a taught band of tissue that holds the arch of the foot. There are also TONS of layers of muscles on the bottom of the foot that can give pain as well meaning the pain generator is not just the plantar fascia, it can be from muscles as well.
The pain can come in a few different forms – sometimes it’s pain on the heel, sometimes it’s pain on the arch. There are a few other things that “foot pain” could be, but there are a few classic signs of PF:
Pain that is worse with the first few steps out of bed in the morning
Pain after a longer time standing, walking, or running
Pain that seems pin pointed on the bottom of the foot and is sensitive to the touch.
None of the above can rule in or rule out the diagnosis, but many people who come see us for PF pain present with some of the above. The main issue with PF is that it gets stressed every day because we are upright beings and we constantly have to put pressure on the spot that hurts. PF tends also to hang around way too long and when treated improperly, can lead to a very long bout of unnecessary foot pain.
Most people get a flare up from doing a bit more of something that they aren’t use to. How can you get it?
Running longer
More hills/inclines
A change in shoes
A significant change in terrain (I got it when I went hiking for the first time last season and wore running shoes)
Doing more of the same activity that you aren’t used to
Doing more walking in different shoes (walking around the city for the day in flats or flip flips if you aren’t used to it
The most common ways that people manage this type of foot pain is with ice, stretching, rolling the bottom of their foot on a ball, anti-inflammatory medications, and orthotics. While all of those play a role in the recovery process, there are some other things that should be focused on to really make the most out of your rehab.
The initial stage (0-72 hours)…
Gentle stretching, ice, and normal walking around, etc is appropriate especially if it is super irritable. But this really should only last as the sole type of treatment for the first few days of a flare-up. Yes… only for the first few DAYS! This means that more can be done that is much more beneficial if this has been going on for longer than a few days.
Anything but the initial stage (past 48-72 hours)…
You can continue to stretch, ice, ball massage, etc but there is a key component to PF pain that most people don’t address. This is the concept of adding stress to the foot. This would seem counterintuitive, right? Why would we want to stress an already overworked and stressed area of the body? That is actually how rehab works… in many cases our body responds best to adding an appropriate amount of strain to actually get it back to normal. Sometimes, that initial addition of strain gets the area a bit cranky, but as it is repeated that crankiness actually subsides.
This explanation was very brief for the purposes of this article so I want you to keep in mind that every pain experience is different and involve many other factors that affect the treatment outcome. This information can at least set the stage on the idea that there is more to PF pain than ice massage with a frozen water bottle and time off from the treadmill.
Here are some of our go-to PF pain exercises!
Toes elevated heel raise – This exercise targets the plantar fascia directly to give a combined load stress and stretch.
Single leg heel raise (modified) – This exercise is imperative for ALL RUNNERS to be performing on the regular. Single leg heel raise strength is incredibly important for runners – you are NEVER on two feet and your calves do a ton of work. They need isolated training and it needs to be hard enough to make gainz. This is a modified version for someone with irritable PF pain, a progression would be to loose the bench and perform with hand-held assist on a chair or wall. This exercise not only strengthens the calves but it also works on the foot muscles as well which can help build and repair the irritated foot!
Double leg weighted heel raises – This is another staple in anyone’s foot pain program. Double leg her raises work to build up the calf muscles which, as stated above can help build and support the foot as well. The double leg feature allows both calves to work, adding load can help make it challenging enough to make changes.
Lastly… Are you more of a visual / auditory learner? I put a little video together explaining the exercise in the first video! How to help your foot pain
Were you intrigued by this an have more questions? Please reach out!
There are so many exercises in the world of fitness that we can not keep up. My advice is to keep hold on some basic moves to make sure that you are covering all your bases.
Today we are going to cover some core exercises that most people don’t do regularly. Why aren’t they doing them? Most people perform core exercises that keep your core in a “stable” or stationary position. Those types of movements are great, but one of the best things we can do is keep our “core” well rounded position (not literally…).
What do I mean by well rounded?
We want to move our bodies in all directions! We want to be able to bend forward, backward, rotate and twist. In order to be able to do so, we have to teach our core to help out.
So what is our core?
It is from your mid chest and upper back down to your mid thigh! That whole thing is your core! I am going to review some of my favorite exercises that hit all of those ares.
What is the benefit of core work?
Can improve performance! It can help people perform better at their sport or activity and make you stronger and more confident to do household chores like carrying in groceries.
Can help with pain! Core movements are a staple in many of our rehabilitation programs no matter where someone is experiencing pain.
Can help flexibility! Have you ever said that you have tight hamstrings? I sure have heard that… guess what? Core exercise can help.
This is a phenomenal movement that can help strengthen your abdominal muscles and get you more flexible hamstrings. It is so common that people can not do this move! Can you do it?
Back extension exercise can help improve low back pain and flexibility. It can also help strengthen the spinal muscles that help support your entire body! If you do not have a ball like in the video, you can use a ottoman or a stack of pillows.
This is a holding exercise that helps the straight leg sit up and hamstring flexibility. Sometimes this can be very challenging for people to hold for any time at all so have low expectations…
Have you ever felt your back feel tired? This is the exercise for you. It can make your back feel like it is working and guess what? That is exactly what we are looking for!
Today we are going to highlight Joe, who has been doing great things since having his hip replaced at the end of October. When Joe first came to us, he had only had his right hip replaced two weeks earlier. As expected, he was having some pain and difficulty getting around. This wasn’t Joe’s first hip replacement, which meant he was well prepared for all the physical therapy and the time it would take to get back to 100%.
Here is Joe’s story:
“I was recovering from hip replacement surgery. This was my second hip replacement and I also struggled with overall mobility issues. Prior to the surgery my daily activities and workout programs were limited. I am very active and like a lot of activities that keep me moving and on my feet. Everything from remodeling my home, climbing ladders, cross-fit training were all painful and were becoming less and less enjoyable for me. Although my first hip replacement was successful, I wanted to take a more focused approach to recovery this time. It’s been 4 years since the first surgery and I still feel weakness in that hip. I was determined this time to find a program that could improve strength in both hips, improve my mobility and balance.”
“I found myself immediately doing movements that I didn’t expect do for months. The focus on a variety of single leg movements has helped strengthen my legs and hips as well as improve balance and core strength. At this point I’m able to do movements that I haven’t been able to do in years. I’m pain free and able to do all activities that I enjoy.”
“I really appreciate that on my first day Colin asked me what I wanted to get out of the program. We set goals which have been achieved and Colin continues to check in on what else I feel I need to work on. My sessions are challenging and fun. It’s nice to be able to work hard, but have a good conversation and a laugh while pushing some new boundaries. I really like that when I leave the session Colin sends a workout program to me to focus on in between appointments. I would highly recommend this program to anyone.”
I have had a ton of fun working with Joe, he is constantly upbeat and motivated to take on new challenges. Joe is always consistent with his program at home and is seeing the payoff from his efforts. This combination of great effort during our sessions and commitment to working hard at the gym are why he has made so much progress so quickly with his hip. I’m excited to keep working with Joe and help him reach all his goals. Thanks for being so committed to this program, we are all very proud!
The front rack position is a challenging position for many people who exercise with a barbell. It is involved in many movements, including the front squat, clean, jerk or pretty much any movement that requires you to keep the barbell rested on the front of your shoulders. In my experience, it’s mostly men who deal with the lack of flexibility but women alike also struggle with keeping it during many of the movements. Some struggle to get in position, and some struggle to just keep the position. There are reasons for both of those issues to happen and the way we help each are slightly different. If I had one piece of advice for anyone it would be to lose the “elbows up” mentality and think “elbows forward”. This idea gets the proper shoulder muscles engaged and really helps strengthen the position.
In this article we are going to go over the following:
Flexibility fixes
Strengthening exercises
Modifications for front rack struggles
All of the above can be beneficial for anyone who has limitations in this position, but most people need an individualized program to be sure you are not wasting your time working on something that is not for you. That being said, we will also go over a few tests to be sure you know which exercises to choose. Enjoy!
Let’s check flexibility!
Do you think flexibility is the issue? Check to see if that is the case with the following tests.
Wrist mobility
You need full wrist flexibility to get a full front rack position. Test it out!
Get on the floor on your hands and knees, pointing fingers away.
Keep fingers flat on the floor as you shift your weight forwards.
Can you keep your palms down and get your shoulders and chest over your hands?
Yes? You have great wrist mobility and do not need to spend time here!
No? You have stiff wrists and forearms, you should probably spend time here.
This is an area that will help any and all wanting to either achieve, improve or refine their front rack position. Most feel that the front rack is all about flexibility, but in most cases it isn’t. It actually takes a ton of upper back, core, and shoulder strength to be able to keep that bar in place. Here are some drills that will really make a huge impact! Get ready, they get pretty spicy.
This is a great drill that can be used as a warm-up. You want to think about pushing your elbows forward as you raise them up. I like to say, “scooping” the arms because I would like your elbows to stay bent. The bent position is VERY important as it simulates part of the front rack position. Three sets of 8 is a perfect amount.
This one is a KILLER. This accessory movement works on everything front rack. Try and keep the forearms parallel to each other the entire time. Begin with 3 sets of 10-12.
This helps build the core strength as well as shoulder position and endurance. This another, like the military press rotation, helps if you have a great front rack position but have issues keeping it. Keep that upper back pushed towards the ceiling the entire time.
This is the last and final in the front rack strength prescription. Just more front rack. Really focus on tight belly, stand straight up, and forward elbows (not “high” elbows). Remember to breathe. Start with about 50% of your max front squat and hold for 1 minute. Rest about 60-90 seconds, then repeat for a total of 3 sets. If that felt easy, go heavier next time.
Lastly, we will go over some modifications.
This is going to be talked about last because this is the quick fix everyone wants, but does not get you to where you want to be. Thanks for reading all the way through, but the stuff listed above is much more beneficial in the long run.
This is quite the challenge on the shoulder muscles and it can get pretty sore on the skin. That being said, it can be a great way to opt out of the front rack.
This is a way to continue to keep the bar in front but does not require as much wrist mobility as the front squat. It is a fine modification and many use it frequently. I would not say that there is greater benefit in this one versus the crossed-arm.
I would not consider this a modification, but more of a drill. This helps strengthen the shoulders and gets you more comfortable with the weight of the bar in front of you. If you are proficient with the front squat mobility, but struggle to keep position after many reps, this is a great drill.
I hope this helped! Please share your feedback or send it to friends and fellow athletes who battle this front rack struggle!
We’ve all been there, particularly in Resolution January. The neighborhood gym is PACKED, your favorite weights are in someone else’s grip…what’s one to do?! Go ahead and pick up that unwieldy and mysterious kettle bell in the corner. You’ll be glad you did.
Kettle bells didn’t originate as dust collectors at the gym. Ancient Greeks (think Olympics) used spherical stones for competitive weight competition and strength training. The traditional kettle bell shape as we know it today was first seen in Russia in the 18th century and had very practical applications. Russian farmers used them as counter weights for grain & produce measurement at country markets.
Fast forward to today: Their application is vast and wide. Just ask a cross-fitter. It’s a staple in Cross-Fit gyms worldwide. From top to toe, a full workout can be accomplished using kettle bells. Here are some favorites:
Farmer’s Carry: Grab two challenging even weight kettle bells. Place one in each hand, palms facing hips. Shoulders back, long tall spine (think Giselle on the catwalk), core engaged – now walk. This underutilized exercise improves grip strength, burns calories, increases heart rate, builds muscle and increases strength. It’s an all-over body workout.
Kettle Bell Swing: Stand tall while gripping one kettle bell with both hands. Your arms are long and relaxed in front of you. Your legs are hip width apart. Hinge forward with your upper body while your derrière moves back. Simultaneously, your knees soften and your weight shifts into your heels. Next, drive through your heels. Explode through your hips to send the kettle bell upward from your legs to a position directly in front of your chest – maintaining straight arms. To achieve this finished position you have to contract your core and squeeze your glutes while in this standing position. As the KB begins to descend again, repeat the hip hinge, derrière back, soft knee, weight in heels activity. This is a phenomenal exercise for the posterior chain: hips, glutes, hamstrings, lats. Plus the cardio boost is a nice extra benefit.
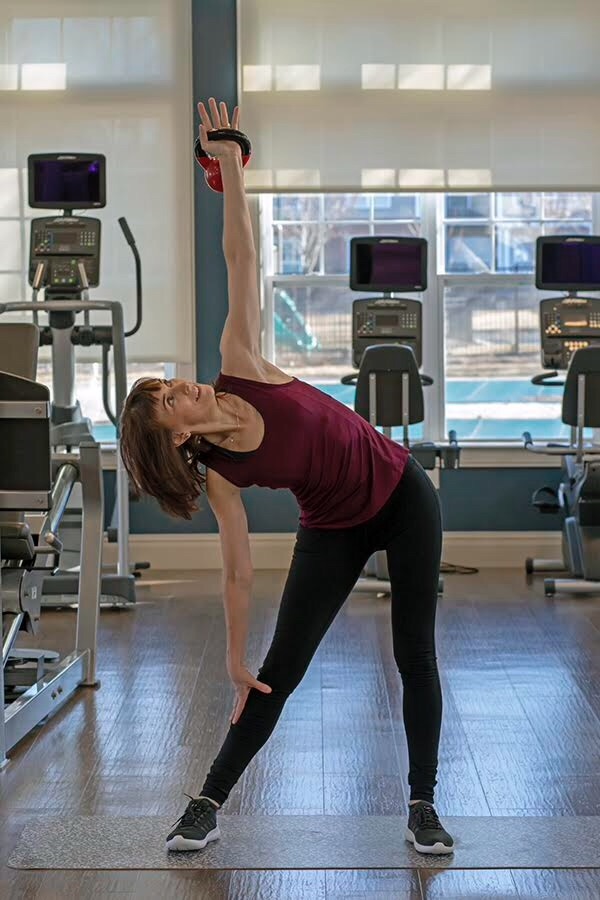
Kettle Bell Windmill: Let’s begin on the left. Grab a manageable weight kettle bell in your left hand. Stand with feet hip width apart. Turn both feet approximately 45 degrees to the right. Bring the weight to your left shoulder and press the weight up overhead (ball facing down). Engage your lats to keep the kettle bell hoisted. Your right arm is relaxed by your side. This is the starting position. Next, keeping your left arm raised and your eyes on your left hand, push your left hip back (hinge) to the side, your derrière pushed slightly back. As you hinge, your right arm slides down your right leg towards the right foot. The left arm remains pointed at the ceiling. Stop. Raise back to standing. That’s one rep. Go slowly. Repeat on the right side. This is a great one to do for deep core work and obliques. It also helps with shoulder, hip and spine mobility.
Here are but three examples of kettle bell applications and we’ve hit virtually every body segment. So branch out. Give them a try. Walk past the weight rack and grab yourself a kettle bell to spice up that 2020 workout.
By Kerry Moynihan Personal Trainer @fit4lifeafter50
How many young kids are there that dream of becoming a professional athlete? Growing up I know I did and so did a lot of my friends. Soon enough you realize that’s probably not possible, but maybe you could still earn a scholarship to college or be a standout athlete in high school. These goals are much more attainable and when a young kid shows they have talent for sports we try to guide them to maximize their talent. That is the natural way to help out these young people. What tends to happen next however, isn’t as helpful. These kids are told, “if you want to be the best basketball player possible, you need to strictly focus on basketball”. Substitute any sport you want, but consistently what happens is we encourage these kids to pick one sport and specialize.
First, let’s consider some of the pros of specializing. This definitely helps kids to develop specific skills like shooting a basketball or pitching a baseball. They also will have more time to practice and compete in these kinds of sports. If you only have to worry about baseball, there is a lot more time to spend working on those skills. However, we don’t always think about the potential downsides of spending more time on one sport.
If you focus on only one sport you are at higher risk for overuse injuries from repeating the same motions over and over again. One example of this would be pitching a baseball. Most of us have heard of Tommy John surgery and some may have heard about how this is becoming more and more common in young athletes. One study found that this injury is increasing by 9% each year in 15-19-year-olds. The repeated stress of movements like this can lead to injuries and thus hurt young athletes’ chances of becoming a great high school or college athlete.
Another area that tends to get overlooked is the psychological burnout of playing just one sport. When you spend so much time doing just one activity you can grow tired of it. Spending multiple days of the week at soccer practice and then on the weekend playing for your travel team can take up almost all of your free time. You might miss hanging out with friends, birthday parties, or even just having time to sleep in and relax. Kids need to want to play their sport and they should be the one making the choice to go to these practices and games. One of the keys to success is truly loving the sport you play and enjoying time at games and practices.
Now let’s talk a bit about why playing multiple sports is so good for young kids. Each sport is unique. It requires you to move in different ways and accomplish different tasks. The rules, teammates, coaches, and fields are all different as well. This variety helps athletes to learn how to work in different settings and how to be successful in all kinds of ways. Soccer focuses a lot on cutting and shuffling side to side. These kinds of movements are extremely similar and beneficial to other sports like basketball or tennis. A baseball player may need to focus on throwing the ball, but they also would benefit from sports focusing on speed, shuffling side to side, or developing hip strength. The truth is our bodies need to be able to move in all kinds of ways to be most successful in sports and one of the best way to develop these different movements is to expose yourself to them by playing.
Now some kids just don’t want to play anything besides their favorite sport and that’s okay too. We can’t force kids to do something they don’t want to and should encourage them to find other kinds of training to help them. In this case I will recommend that these athletes get involved in a strength and conditioning program. This will allow them to focus on muscle groups that aren’t being addressed in their regular sports. They will be able to work on their weaknesses and even further develop their strengths. Starting a regular training program is really something every young athlete should be doing.
Another area we should address is free play. Kids need to have time to just running around without any specific rules or structure. Growing up we used to play games like capture the flag, manhunt, freeze tag, and a bunch of other games. Doing things like this is really important to developing as an athlete. This gives young kids the chance to be creative, move in a variety of ways, and learn to think outside the box without rules or boundaries. This is one reason why we always encourage kids to spend time playing with friends and having fun making up their own games.
If you find yourself wondering if you child is playing too much of one sport there is a great simple rule that can help you figure this out. It’s called the rule of age. Basically, you shouldn’t play more hours of one sport per week than you are years old. For example, a 12-year-old shouldn’t be playing hockey more than 12 hours a week. As you get older and mature more your body is better able to tolerate the repetition of a given sport. However, this rule does cap at 16 years old so no matter if you’re 16 or 18- the max number of hours you should play a sport each week is 16 hours.
Sports are a great way for kids to learn teamwork, leadership, and develop physical fitness. If your child is good at a sport and enjoys playing it that is also great! However, this doesn’t mean they should drop all other sports to focus on just one. As we have talked about, this can be detrimental to their risk for injury and overall motivation to keep playing. One NCAA survey found that 88% of division 1 athletes played more than one sport in high school. The best way to help young athletes to be successful is keep them healthy and motivated to be the best than can be. Encourage kids to spend time just having fun without structure and to play all different sports they enjoy.
Now we are into a new year some of you have just started a new fitness journey motivated by a fresh year to try something different and become a little better than last year.
Here are some tips to help you make it last past March!
First of all, you are still the same you and need to keep your new goals within reach. Don’t try to do too much at once or too soon . Yes, you may have all the motivation in the world right now but doing 5-6 classes a week will not help you stay consistent in the long run. Start with as little as l0-15 minutes 3 times a week and then build that time up from there.
You will be more successful if you start on the slower side and then build up when you are ready. This is a long term strategy, it needs to be something you can continue with and build into your lifestyle. Set realistic goals. Whether it’s weight loss, strength, or hitting a certain running distance make sure the goal is achievable. Set smaller goals to hit along the way so you can see your progress.
If you don’t feel like going to the gym or class and are starting to slack with your fitness try to remember the immediate effects you will feel by working out, not just the long term. E-g. Think how good it feels after exercising and how energized you will be, also things like your sleep will be better, and stress will be less.
This will help to keep you motivated to work out in the moment.
Schedule the classes or times you will hit the gym. Putting it in your planner will keep you on track and maintain a routine so it becomes like brushing your teeth or going to work.
As well as writing down scheduling in a planner write down your progress. Progress may be small but over time you can look back and see how far you have come!
We are going to start off the New Year with a super informative post about exercises that must be added into your workout routine. This applies to anyone who wants to be injury resistant, stay active, or improve performance. I do not care if you are a marathon runner, a weekend warrior, a ski bum, a CrossFit or OrangeTheory junkie… These exercises must be added into your routine.
Strength training is one of the best ways to stay injury-resistant (in general). That being said, strength training does NOT include bootcamp or high-intensity workouts that use weights. Strength training involves using specific and focused exercises that target all the major areas of the body performed in a manner that does not necessarily have you laying on the floor in a pile of sweat.
This type of routine involves movements that we do every day (ie. Squat, pick things up from the ground (deadlift or lunge), push (bench press), carry (grocery haul into the house), etc… They also MUST be performed with weights that are challenging enough to make changes in our body occur as long as we can perform the movements properly.
Now… adding a regular strength routine into your workout regimen is a topic for another post. The topic of THIS post is to provide you with insight on FOUR exercises that you SHOULD be doing regularly.
The focus is on single leg movement! Why do single leg activities?
They help retrain each side of the body somewhat separately which can help with life’s challenges such as climbing up onto high surfaces as in a tuck bed or on a hike.
They can help with certain aches and pains we have on one side of the body and not the other.
Have an old injury? There is probably some weakness over there that is not present on the other side… single-sided work can help even that out.
Are you a runner or do you run? You are never on 2 feet when you are running… training single leg work can optimize running performance and decrease injury risk!
This movement is very challenging for most people. The video above shows the version while holding onto rings (also can be done with TRX straps).
TIP: keep your weight centered in your entire foot as you squat vs your heel. If you ever want to get to the point of doing these unassisted, you MUST lean your torso forward a bit and have full weight in your foot to perform properly.
This movement is not AS challenging as the single leg squat at first, but can still be tough when performing as low as the video. If you feel you need a modification, click this assisted skater squat demo.
TIP: do not allow the back leg to be planted – just tap your shin to the targeted surface.
This is a fabulous version of the split squat that works the front AND back leg. Looking to get more flexible hip flexors? Look no further than this bad boy movement.
TIP: make sure that you have your legs far enough apart so when you perform the squat you can feel a nice stretch in the back leg while keeping your torso upright.
These are just a few but some of the best and most bang for your buck. I would suggest beginning without weight and adding resistance once you get comfortable with the movements!
I met Debbie while attending an OrangeTheory Fitness class last summer. She was the incredibly energetic one in the lobby talking to everyone, psyched to go sweat her butt off for an hour. Despite noticing her personality and energy, I also noticed that she had a brace on her knee and NEVER ran on the treadmill. This was obviously something I noticed being a performance-based PT who helps people get back to running all the time. Class after class, no running… I did not want to ask her, I figured (like most) she will call at some point.
Sure enough, one morning I get a text on facebook and it was Debbie! She wanted to know how she could get back to running.
This is her story…
“After 30+years of running, last October, 2018, I had minor knee surgery In order to a correct an ongoing problem. As I said, the surgery was minor. The realization that I wasn’t going to run again was not so easy for me to accept. Running had always been my “go to” exercise. It kept me sane. The thought of having to find a new “go to” was difficult.
As much as I wanted to accept the elliptical as an alternative, that wanting to run kept nagging me. Months of routine physical therapy after my surgery was helpful but not to the point that I was satisfied with my progress. My workouts at Orange Theory Fitness are amazing and the coaches are second to none. Their assistance in giving me alternative exercises when needed was/are fabulous. I have to say that as I struggled through some workouts, many of the coaches mentioned Loni Rodriguez to me and suggested that I meet with her. Finally, I did and I am so grateful for her help.
Her approach to physical therapy is so different than what I had experienced previously. I think that one of the biggest realizations that I’ve had is that some of my problem was psychological. I lacked the confidence and was very insecure about trying to run again.
Loni helped me to break through these psychological barriers and after 2 months of knee strength training and some real baby steps, I’ve started jogging with minimal discomfort. I love it!! I really never thought I’d be actually able to do this again.
I will continue my therapy with Loni for as long as I can. Her ability to break through and help me conquer my frustrations is something that you don’t get with other physical therapists. I recommend Infinite Potential Physical Therapy and Loni Rodriquez for any rehabilitation program.“
This is why we do what we do. I am not going to turn Debbie into a runner overnight or even get her back to 100%, but we set realistic expetations and goals to achieve. She is now doing very well and back on that treadmill every few classes. Of course, there are still some aches and pains but she has gotten back to something she loves to do!
Thank you Debbie, for being such a hard-working client. We are all very proud!